
Buck Boost Digital Switching Power Supply
Buck Boost Digital Switching Power Supply
This project was my collaborative final year project with another Electronic engineering group at GIKI. Circuit design, Arduino programming and prototyping were all done by me. They intended to use this type of supply to charge a lead acid battery with a solar panel and increase the efficiency of the solar panel by concentrating the sunlight on the panel and water cooling it to prevent heat damage. Their copy of the project contained a simple 16x2 LCD and 4x4 keypad. They got the highest grade (A) for this project.

This is a digital switching power supply controlled by Arduino. There is not even a single push button, hardware keypad, potentiometer, rotary encoder or any other input device except than the touchscreen to control the power supply. The power supply is equipped with a 3.5 inch color TFT LCD with resistive touch panel.
Buck-Boost Converter
A Buck-Boost converter is a type of switched mode power supply which combines the principles of the Buck Converter and the Boost converter in a single circuit.
Block Diagram
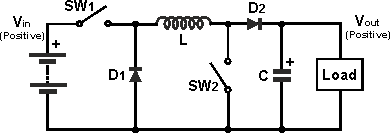
Working Principle
Operation as a Buck Converter
In this mode SW2 is turned off, and SW1 is switched ON and OFF by a high frequency square wave from the control unit. When the gate of SW1 is high, current flows though L, charging its magnetic field, charging C and supplying the load. The Schottky diode D1 is turned off due to the positive voltage on its cathode.
When the control unit switches SW1 OFF, the initial source of current is now the inductor L. Its magnetic field is collapsing, the back e.m.f. generated by the collapsing field reverses the polarity of the voltage across L, which turns on D1 and current flows through D2 and the load.
As the current due to the discharge of L decreases, the charge accumulated in C during the ON period of SW1 now also adds to the current flowing through the load, keeping Vout reasonably constant during the OFF period. This helps keep the ripple amplitude to a minimum and keeps the Vout at a constant level during the whole ON/OFF cycle.
Operation as a Boost Converter
The OFF Period
At the start of the OFF period of SW2, L is charged and C is partially discharged. The inductor L now generates a back e.m.f. whose value depends on the rate of change of current as SW2 switches OFF/ON and the inductance value; therefore the back e.m.f can be any voltage over a wide range, depending on the design of the circuit. Notice particularly that the polarity of the voltage across L has now reversed, and so adds to the input voltage Vin giving an output voltage that is at least equal to or greater than the input voltage. D2 is now forward biased and so the circuit current supplies the load current, and at the same time re-charges the capacitor to Vin + VL ready for the next ON period of SW2.

We used two MOSFETs (stp80nf70 ) as the switches SW1 and SW2 which are driven by PWM signals from Arduino. As stp80nf70 MOSFETs require a full turn ON voltage of 15V which can not be supplied by Arduino so a level shifter circuit per MOSFET is used. The level shifter shifts the 0/5V level to 0/Vcc or 0/15v in a typical case but it can work as low as Vcc=4V according to datasheet.

Implementation

We used two MOSFETs (stp80nf70 ) as the switches SW1 and SW2 which are driven by PWM signals from Arduino. As stp80nf70 MOSFETs require a full turn ON voltage of 15V which can not be supplied by Arduino so a level shifter circuit per MOSFET is used. The level shifter shifts the 0/5V level to 0/Vcc or 0/15v in a typical case but it can work as low as Vcc=4V according to datasheet.


The output voltage of the buck boost coverter is reduced by a series resistor divider network which is read by Arduino's ADC and the PWMs are adjusted by two software PID controllers implemented in Arduino to keep the output voltage equal or near to the set voltage. Thus a closed loop system is implemented.One PID controller controls buck mode while the other controls the boost mode. The 5.1V zener diode protects the Arduino from damage if in case the voltage goes higher than 5.1V.
Graphical User Interface (GUI)

Keypad

The required output voltage can be entered through an on screen keypad with touch input. The output voltage can be set from 0-32V while the input voltage can be anywhere from 6-30V.
If the output voltage higher than 32V is entered, the screen displays an error messsage. The output voltage can be set to lower,equal or higher than the input voltage.
Output Terminals
Uses/Applications
This power supply has more applications than a typical power supply because its voltage can be lower than, equal to or higher than the input voltage. Following are some of the applications
1) It can be used to charge batteries with solar panels. As the sunlight brightness changes, the solar panel voltage can go lower or higher than the battery charging voltage, therefore, this power supply can be used to keep the charging voltage constant at a constant value.
2) It can be used to supply 9V/12V or higher voltages to different electronics items like wifi routers , laptops etc from a 6V lead acid battery or a 7.2V Li-ion battery.
3) The circuit can be used to provide different voltage levels in a circuit from a single supply.
3) The circuit can be used to provide different voltage levels in a circuit from a single supply.
Future Enhancements
1) The microcontroller can be upgraded to an ARM processor which typically has 72 MHz or higher clock and built in hardware LCD controller. This will increase the refresh rate of the LCD which is awfully slow in Arduino.
2) Dedicated switch mode power supply ICs like TL494, LTC3789, LM5118 can be used to reduce the ripple voltage and decrease inductor/capacitor size due to their high PWM frequencies. Also the response time will improve due to hardware implementation (op-amps) of voltage regulation.
3) The efficiency will also improve by using dedicated ICs.
Video of Final Working Product
Arduino Code
#include <UTFT.h>
#include <UTouch.h>
#include <UTouch.h>
int state=1;
UTFT myGLCD(ILI9327,38,39,40,41);
UTouch myTouch( 6, 5, 9, 3, 2);
// Declare which fonts we will be using
extern uint8_t arial_italic[];
extern uint8_t Inconsola[];
extern uint8_t hallfetica_normal[];
//extern uint8_t SevenSegNumFont[];
//extern uint8_t SevenSegmentFull[];
extern uint8_t GroteskBold32x64[];
extern uint8_t nadianne[];
//extern uint8_t swiss721_outline[];
extern uint8_t arial_bold[];
//extern uint8_t DotMatrix_M_Slash[];
int x, y;
char stCurrent[20]="";
int stCurrentLen=0;
char stLast[20]="";
//*********************switching global********************************
#include
//int buckPin=5;
int buckPin=4;
//int boostPin=6;
int boostPin=13;
int boostLimit=230;
int numReadings=10;
double vin=0;
//buckPID variables
double vref=8;
double vout, buckPWM;
int voutRealDisplayCount=60;
int vinDisplayCount=100;
boolean switchToBuck=false;
//boostPID variables
double boostPWM;
//Specify the links and initial tuning parameters
//PID buckPID(&vout, &buckPWM, &vref,2,5,1, DIRECT);
PID buckPID(&vout, &buckPWM, &vref,3,30,0.5, DIRECT);
//PID boostPID(&vout, &boostPWM, &vref,2,5,1, DIRECT);
PID boostPID(&vout, &boostPWM, &vref,3,20,0.5, DIRECT);
//*********************end switching global********************************
/*************************
** Custom functions **
*************************/
void drawSetVoltageButton(){
myGLCD.setColor(204, 204, 153);
myGLCD.setBackColor(204, 204, 153);
myGLCD.fillRoundRect (220,120,360,184);//x1,y1,x2,y2
myGLCD.setColor(255,255,255);
//myGLCD.drawRoundRect (10+(x*60), 10, 60+(x*60), 60);
myGLCD.setFont(arial_bold);
myGLCD.print("Set VOUT",225 ,150);
}
void drawButtons()
{
// Draw the upper row of buttons
for (x=0; x<5 data-blogger-escaped-div="" data-blogger-escaped-x="">
{
myGLCD.setColor(0, 0, 255);
myGLCD.fillRoundRect (10+(x*60), 10, 60+(x*60), 60);
myGLCD.setColor(255, 255, 255);
myGLCD.drawRoundRect (10+(x*60), 10, 60+(x*60), 60);
myGLCD.printNumI(x+1, 27+(x*60), 27);
}
// Draw the center row of buttons
for (x=0; x<6 data-blogger-escaped-div="" data-blogger-escaped-x="">
{
myGLCD.setColor(0, 0, 255);
myGLCD.fillRoundRect (10+(x*60), 70, 60+(x*60), 120);
myGLCD.setColor(255, 255, 255);
myGLCD.drawRoundRect (10+(x*60), 70, 60+(x*60), 120);
if (x<4 data-blogger-escaped-div="">
myGLCD.printNumI(x+6, 27+(x*60), 87);
}
myGLCD.print("0", 267, 87);
myGLCD.print(".", 327, 87);
// Draw the lower row of buttons
myGLCD.setColor(0, 0, 255);
myGLCD.fillRoundRect (10, 130, 150, 180);
myGLCD.setColor(255, 255, 255);
myGLCD.drawRoundRect (10, 130, 150, 180);
myGLCD.print("Clear", 40, 147);
myGLCD.setColor(0, 0, 255);
myGLCD.fillRoundRect (160, 130, 300, 180);
myGLCD.setColor(255, 255, 255);
myGLCD.drawRoundRect (160, 130, 300, 180);
myGLCD.print("Enter", 190, 147);
myGLCD.setBackColor (0, 0, 0);
}
void updateStr(int val)
{
if (stCurrentLen<20 data-blogger-escaped-div="">
{
stCurrent[stCurrentLen]=val;
stCurrent[stCurrentLen+1]='\0';
stCurrentLen++;
myGLCD.setColor(0, 0, 0);
//myGLCD.print(stCurrent, CENTER, 224);
myGLCD.print(stCurrent, CENTER, 200);
}
else
{
myGLCD.setColor(255, 0, 0);
myGLCD.print("BUFFER FULL!", CENTER, 192);
delay(500);
myGLCD.print(" ", CENTER, 192);
delay(500);
myGLCD.print("BUFFER FULL!", CENTER, 192);
delay(500);
myGLCD.print(" ", CENTER, 192);
myGLCD.setColor(0, 255, 0);
}
}
// Draw a red frame while a button is touched
void waitForIt(int x1, int y1, int x2, int y2)
{
myGLCD.setColor(255, 0, 0);
myGLCD.drawRoundRect (x1, y1, x2, y2);
while (myTouch.dataAvailable())
myTouch.read();
myGLCD.setColor(255, 255, 255);
myGLCD.drawRoundRect (x1, y1, x2, y2);
}
/*************************
** Required functions **
*************************/
void mainScreenDraw()//state=1
{
myGLCD.clrScr();
//myGLCD.fillScr(134,237,38);light green
myGLCD.fillScr(239,233,242);//light grey
drawSetVoltageButton();
myGLCD.setBackColor(239,233,242);//light grey
myGLCD.setColor(210, 100, 40);//light red
myGLCD.setFont(arial_bold);
myGLCD.print("Buck Boost Chopper Supply",LEFT,220);
myGLCD.setFont(arial_bold);
myGLCD.setColor(255,0,0);// red
myGLCD.print("VOUT set",40,20);//for 1st voltage
myGLCD.setColor(0,255,0);//light green
myGLCD.print("VOUT real",240,20);//for 2nd voltage
myGLCD.setColor(0, 0, 255);//blue
myGLCD.print("VIN",65,190);//for 3rd voltage
//VOUT set
myGLCD.setFont(GroteskBold32x64);
myGLCD.setColor(255,0,0);// red
myGLCD.printNumF(vref,1,20,40);//1 decimal place, x=40, y=40, 46 = ".", 3 characters, 48= "0" (filler)
myGLCD.setColor(255,0,0);// red
myGLCD.print("V",160,40);//for 1st voltage
myGLCD.setColor(0,255,0);//light green
myGLCD.print("V",360,40);//for 2nd voltage
myGLCD.setColor(0, 0, 255);//blue
myGLCD.print("V",160,120);//for 3rd voltage
//display VIN
myGLCD.setColor(0, 0, 255);//blue
myGLCD.printNumF(vin,1,20,120);//1 decimal place, x=40, y=40, 46 = ".", 3 characters, 48= "0" (filler)
state=2;
}//end mainScreenDraw()
void inputScreenDraw()//state=3
{
myGLCD.clrScr();
myGLCD.fillScr(239,233,242);
myGLCD.setFont(nadianne);
myGLCD.setBackColor(0, 0, 255);
drawButtons();
//myGLCD.setFont(Inconsola);
myGLCD.setBackColor(239,233,242);
state=4;
}//end inputScreenDraw()
void regulate()
{
if (Serial.available() > 0) {
double vol = Serial.parseFloat();
Serial.println(vol);
vref=vol;
}
vout=0;
for(int i=0;i
// read the input on analog pin 0:
vout = vout + analogRead(A1);
}
vout=vout/numReadings;
vout=vout*0.0493;
//Input=Input*0.0229;
Serial.print(vout);
Serial.println(" V");
if(buckPWM<255 data-blogger-escaped-amp="" data-blogger-escaped-boostpwm="=0" data-blogger-escaped-switchtobuck="=true){</div">
switchToBuck=false;
buckPID.Compute();
analogWrite(buckPin,buckPWM);
}
else{
boostPID.Compute();
//if(boostPWM < boostLimit)
boostPWM = map(boostPWM, 0, 255, 0, 230);
analogWrite(boostPin,boostPWM);
if(boostPWM==0)
switchToBuck=true;
}
Serial.print("buck pwm: ");
Serial.println(buckPWM);
Serial.print("boost pwm: ");
Serial.println(boostPWM);
}
void setup()
{
Serial.begin(9600);
//*********************switching setup********************************
TCCR0B = TCCR0B & B11111000 | B00000010; // set timer 0 divisor to 8 for PWM frequency of 7812.50 Hz
analogWrite(buckPin,0);
analogWrite(boostPin,0);
vout=0;
for(int i=0;i
vout = vout + analogRead(A1);
}
vout=vout/numReadings;
vout=vout*0.0493;
Serial.print(vout);
Serial.println(" V");
buckPID.SetMode(AUTOMATIC);
boostPID.SetMode(AUTOMATIC);
//*********************end switching setup********************************
myGLCD.InitLCD();
myTouch.InitTouch();
myTouch.setPrecision(PREC_MEDIUM);
mainScreenDraw();
}
void loop()
{
if(state==1)
mainScreenDraw();
else if(state==2)
{
regulate();
if (myTouch.dataAvailable())
{
myTouch.read();
x=myTouch.getX();
y=myTouch.getY();
if ((x>=220) && (x<=360) && (y>=120) && (y<=184)) // Button: Set VOUT
{
Serial.println("key press");
state=3;
}
}
//VOUT real
if(voutRealDisplayCount++==60)
{
myGLCD.setColor(0,255,0);//green
myGLCD.printNumF(vout,1,220,40);//1 decimal place, x=40, y=40, 46 = ".", 3 characters, 48= "0" (filler)
voutRealDisplayCount=0;
}
//VIN
if(vinDisplayCount++==100)
{
vin=0;
for(int i=0;i<5 data-blogger-escaped-div="" data-blogger-escaped-i="">
vin=vin+analogRead(A7);
vin=vin/5;
vin=vin*0.0196;
vinDisplayCount=0;
myGLCD.setColor(0, 0, 255);//blue
myGLCD.printNumF(vin,1,20,120);//1 decimal place, x=40, y=40, 46 = ".", 3 characters, 48= "0" (filler)
}
}//end of state 2
else if (state==3)
{
inputScreenDraw();
}//end of state 3
else if (state==4)//input screen loop
{
regulate();
if (myTouch.dataAvailable())
{
myTouch.read();
x=myTouch.getX();
y=myTouch.getY();
if ((y>=10) && (y<=60)) // Upper row
{
if ((x>=10) && (x<=60)) // Button: 1
{
waitForIt(10, 10, 60, 60);
updateStr('1');
}
if ((x>=70) && (x<=120)) // Button: 2
{
waitForIt(70, 10, 120, 60);
updateStr('2');
}
if ((x>=130) && (x<=180)) // Button: 3
{
waitForIt(130, 10, 180, 60);
updateStr('3');
}
if ((x>=190) && (x<=240)) // Button: 4
{
waitForIt(190, 10, 240, 60);
updateStr('4');
}
if ((x>=250) && (x<=300)) // Button: 5
{
waitForIt(250, 10, 300, 60);
updateStr('5');
}
}
if ((y>=70) && (y<=120)) // Center row
{
if ((x>=10) && (x<=60)) // Button: 6
{
waitForIt(10, 70, 60, 120);
updateStr('6');
}
if ((x>=70) && (x<=120)) // Button: 7
{
waitForIt(70, 70, 120, 120);
updateStr('7');
}
if ((x>=130) && (x<=180)) // Button: 8
{
waitForIt(130, 70, 180, 120);
updateStr('8');
}
if ((x>=190) && (x<=240)) // Button: 9
{
waitForIt(190, 70, 240, 120);
updateStr('9');
}
if ((x>=250) && (x<=300)) // Button: 0
{
waitForIt(250, 70, 300, 120);
updateStr('0');
}
if ((x>=310) && (x<=360)) // Button: "."
{
waitForIt(310, 70, 360, 120);
updateStr('.');
}
}
if ((y>=130) && (y<=180)) // Lower row
{
if ((x>=10) && (x<=150)) // Button: Clear
{
waitForIt(10, 130, 150, 180);
myGLCD.print(" ", CENTER, 200);
stCurrent[0]='\0';
stCurrentLen=0;
}
if ((x>=160) && (x<=300)) // Button: Enter
{
waitForIt(160, 130, 300, 180);
if (stCurrentLen>0)
{
double v=StrToFloat(stCurrent);
Serial.println(v);
stCurrent[0]='\0';
stCurrentLen=0;
if(v>32)
{
myGLCD.print(" ", LEFT, 192);
myGLCD.print(" ", CENTER, 200);
myGLCD.setColor(255, 0, 0);
myGLCD.print("Range is 0->32 V", LEFT, 192);
delay(500);
myGLCD.print(" ", LEFT, 192);
delay(500);
myGLCD.print("Range is 0->32 V", LEFT, 192);
delay(500);
myGLCD.setColor(0, 255, 0);
myGLCD.print(" ", LEFT, 192);
myGLCD.print(" ", CENTER, 200);
}
else
{
state=1;
vref=v;
}
}
else
{
myGLCD.setColor(255, 0, 0);
myGLCD.print("Please Enter a value", LEFT, 192);
delay(500);
myGLCD.print(" ", LEFT, 192);
delay(500);
myGLCD.print("Please Enter a value", LEFT, 192);
delay(500);
myGLCD.print(" ", LEFT, 192);
myGLCD.setColor(0, 255, 0);
}
}
}
}
}//end if (setVoltage==true)
}
float StrToFloat(String str){
char carray[str.length() + 1]; //determine size of the array
str.toCharArray(carray, sizeof(carray)); //put str into an array
return atof(carray);
}
Comments
Post a Comment